How to Blur Sensitive Parts of a Video in VN App (Step-by-Step Tutorial)
In today’s digital world, protecting your privacy while sharing videos is more important than ever. Whether you’re a content creator or just someone uploading personal videos, it’s essential to blur personal information like car number plates, faces, or private objects. Fortunately, the VN Video Editor makes this incredibly easy—even if you’re a beginner.
In this step-by-step guide, I’ll show you exactly how to blur specific parts of your videos using the VN app. Whether you’re trying to hide a face, a license plate, or any private object, this tutorial will walk you through the process with clear, easy-to-follow instructions.
Why Blur Your Videos?
Blurring is essential for maintaining privacy and complying with data protection regulations like GDPR. It’s especially useful for:
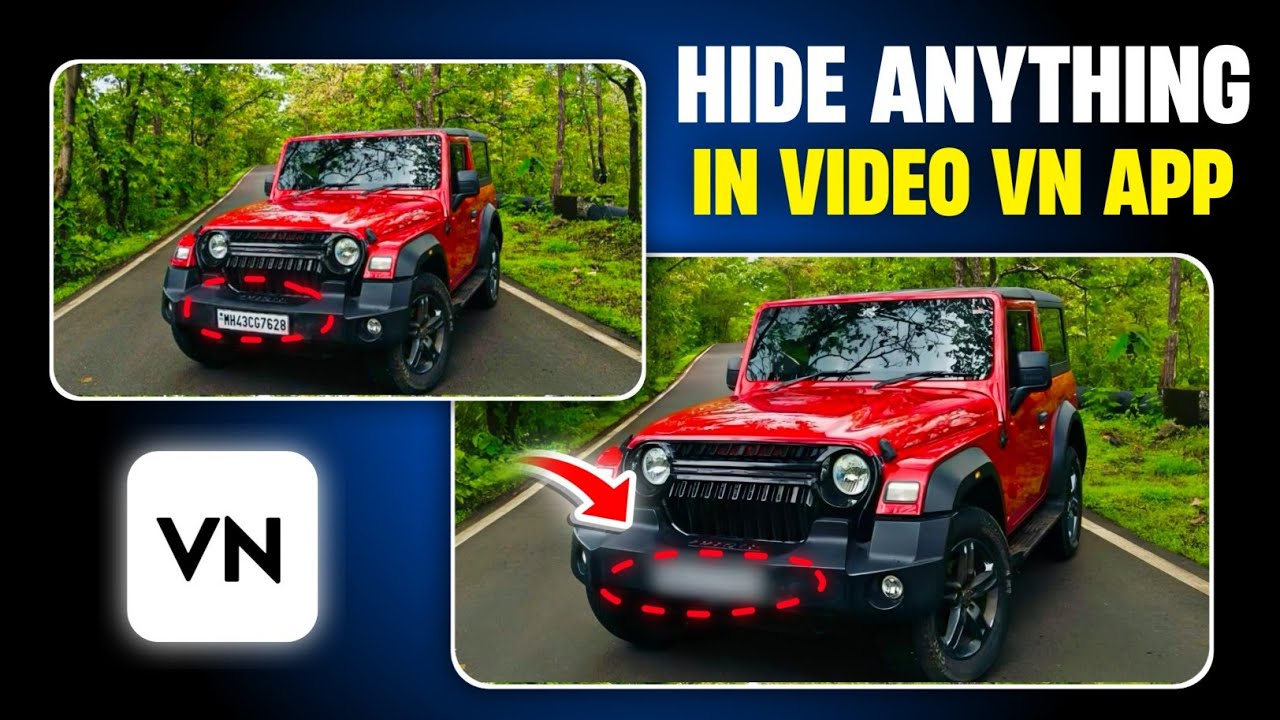
- Hiding car number plates
- Blurring people’s faces (especially minors)
- Concealing sensitive or confidential information
- Removing unwanted objects from view
Let’s get started with the tutorial using VN Video Editor.
Step 1: Install the VN Video Editor App
First, download and install the VN App from the Google Play Store or Apple App Store. Open the app, and you’ll see a simple, beginner-friendly interface.
Step 2: Create a New Project
Click the “+” icon and choose “New Project.” Now, select the video clip you want to edit and click “Next.” Your video will load into the timeline.
Step 3: Preview the Video
Play the video to identify the section you want to blur. For example, if you need to hide a license plate, watch the video until the number plate becomes visible. This is where your blur effect will be applied.
Step 4: Apply Basic Blur
Click on the video clip in the timeline. Scroll below until you find the “Blur” option. Tap on it, and you’ll be presented with various blur styles such as:
- Basic Blur
- Horizontal Blur
- Vertical Blur
Select the style that best fits your scene. For license plates, Horizontal Blur usually works well. Adjust the blur strength using the slider to match the visibility you desire. You don’t need to overdo it—subtle is better for realism.
Step 5: Mask a Specific Area
Sometimes, you don’t want the entire video to be blurred—just a small section like a face or a plate number. Here’s how to mask a specific area:
- Click on the “PIP” (Picture-in-Picture) tool.
- Add the same video again as an overlay.
- Resize it to fit the full screen using the “Fill” or “Fit” option.
- Now scroll and click on “Mask.”
Choose “Rectangle” or “Circle” depending on the shape you want to blur. For example, use rectangle for number plates and circle for faces. You can also check out this guide from TechSmith on choosing blur shapes.
Step 6: Adjust the Mask Area
Once the mask is selected, resize and position it over the area you want to hide. Make sure the shape covers the entire object properly. If the object moves (like a person walking or turning), you’ll need to animate the mask.
Step 7: Use Keyframes for Moving Objects
Blurring a moving object like a person’s face requires tracking. VN allows you to manually adjust the mask using Keyframes:
- Click the masked video clip and go to “Mask.”
- Add a Keyframe at the start of the motion.
- Move forward frame-by-frame and shift the blur area accordingly.
This ensures that the blur remains on the moving object throughout the video. Keyframing is essential for dynamic videos with multiple subjects.
Step 8: Final Adjustments & Export
Once you’re happy with the blur placement, preview the full video to ensure nothing important is visible. If needed, add extra keyframes for parts where the object becomes visible again.
To export the final video:
- Click on “Export.”
- Switch from Auto to Manual mode to control the resolution and frame rate.
- Set your preferred quality and click “Export.”
Now your video is fully blurred and ready to be uploaded or shared!
Additional Tips
- Use CapCut or Adobe Express as alternatives if you want more advanced features.
- Blurring faces is especially important if you record children or bystanders in public.
- Double-check your entire video to ensure no sensitive info slips through.
Final Words
With just a few steps, you can easily protect your privacy and enhance the professionalism of your content using the VN app. Whether it’s YouTube, TikTok, or Instagram, keeping your content clean and private builds trust and protects your identity.
I hope this tutorial helped you understand how to blur any part of your video easily. If you liked this guide, check out our other video editing tutorials here or follow us for updates on the latest AI tools and editing hacks!
Stay safe, edit smart, and see you in the next one!